This blog provides a comprehensive overview of the user interface (UI) and licensing management customization capabilities within the PC Guard software protection system. The system offers a tiered approach to UI modification, ranging from basic text edits to full programmatic control over the entire licensing lifecycle.
Key takeaways:
- Three Levels of UI Customization: Developers can choose from three distinct methods to tailor the user experience.
- Basic: Simple modification of default text and messages via a built-in language editor.
- Custom Dialogs: Replacement of default dialog boxes with custom-designed resources contained within a separate Win32
.exeor.dllfile, offering significant visual control. - Full Control: Complete management of the licensing process through the application's own code by leveraging an advanced protection interface, bypassing default dialogs entirely.
- Configurable Activation Dialog Behavior: The primary activation dialog's appearance can be finely tuned. It can be set to display on every launch, or be invoked on-demand by the end-user via a pre-configured combination of special keys (e.g., CTRL+SHIFT) or a specific command-line argument (
-PCG_CL_SHOW). - Interactive Custom Buttons: Developers can add functional buttons to the activation, license removal, and license transfer dialogs. These buttons can execute actions such as opening a webpage, launching a help document, running an external application, or composing a pre-populated email with user-specific codes using a rich set of available macros.
- Robust Language Management: PC Guard supports multilingual interfaces through a centralized language editor. Projects can be configured with a default language and multiple optional languages. Deselecting unused languages helps reduce the final protected application's file size.
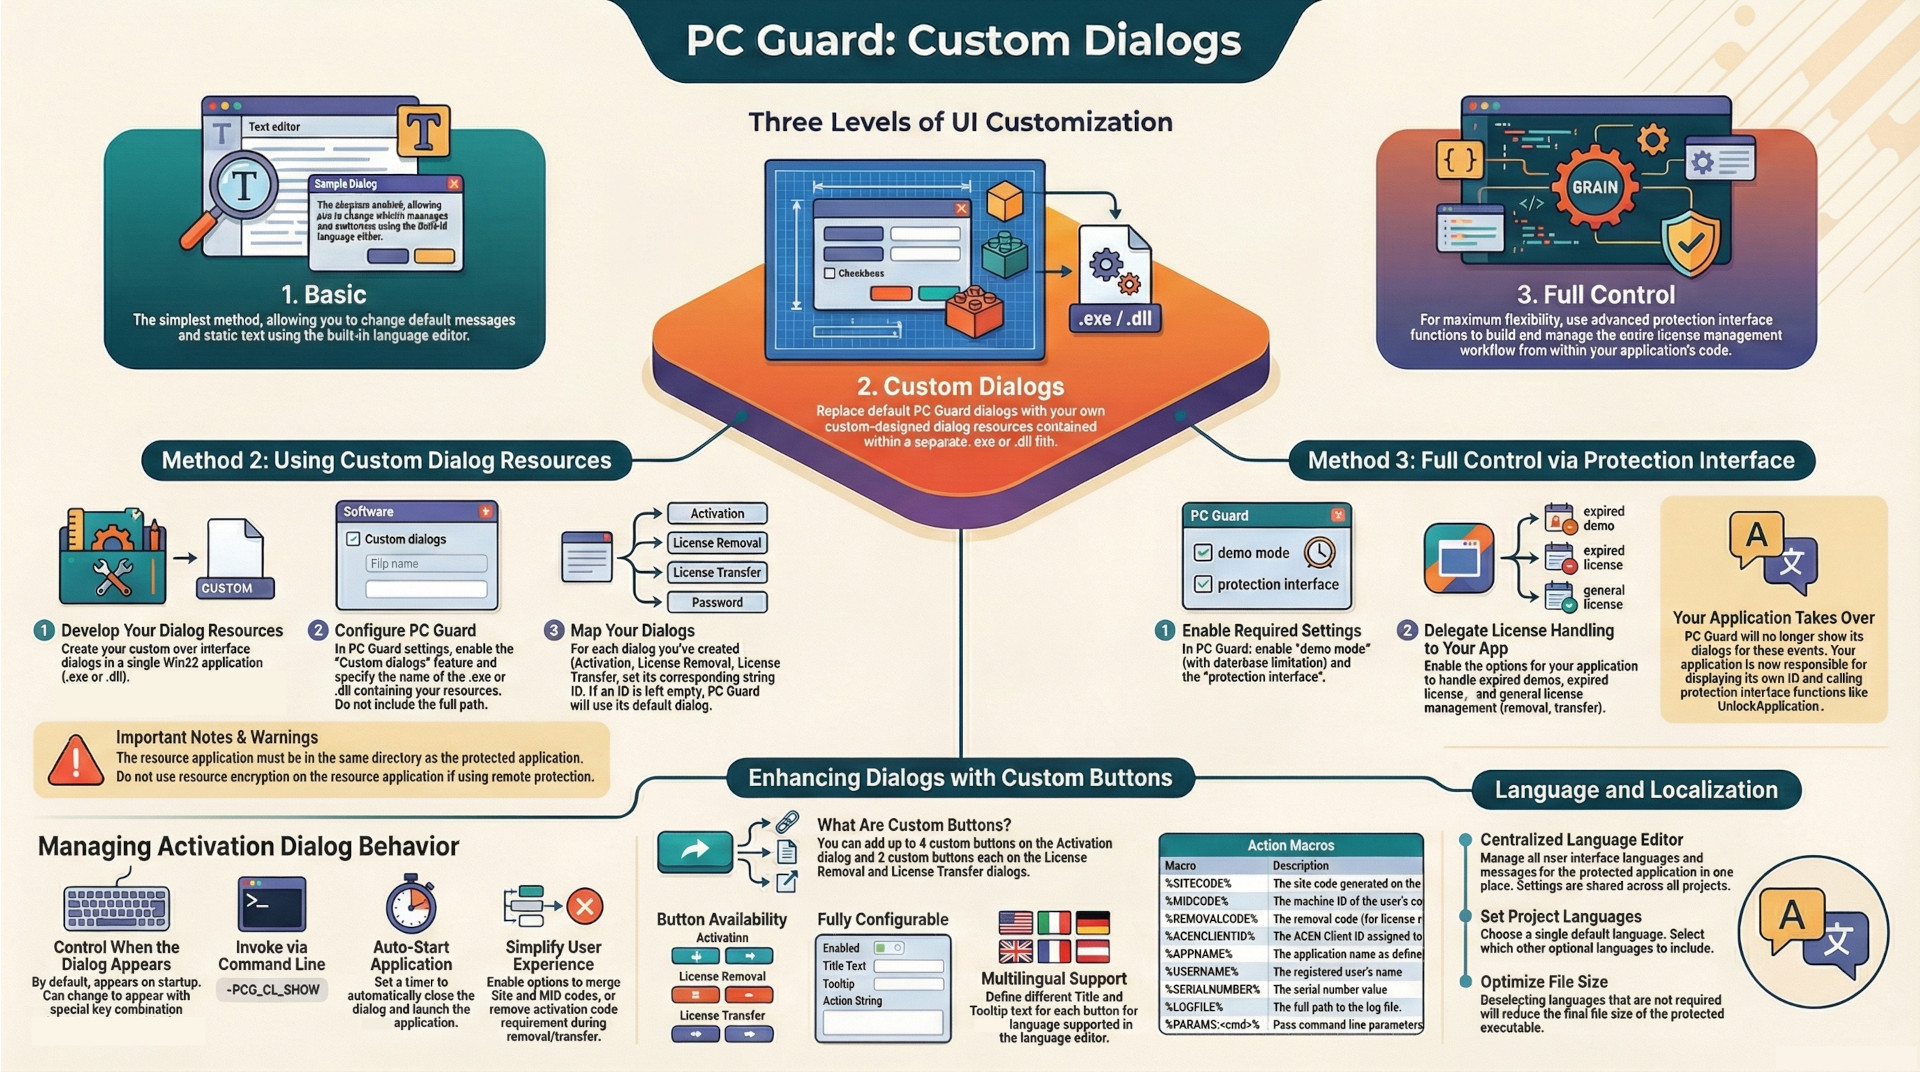
1. User Interface Dialog Customization Methods
PC Guard provides three distinct methods for customizing the dialogs presented to the end-user, allowing for varying degrees of control and complexity.
1.1. Basic Customization
The most straightforward method involves using the integrated language editor to change the default messages and static text displayed on the standard UI dialogs. This approach allows for quick localization and wording adjustments without any coding.
1.2. Custom Dialogs Feature
For more extensive visual customization, developers can replace the default dialogs with their own creations. This is achieved through a two-step process:
Step 1: Develop Custom Dialog Resources
- Custom dialog resources must be created and compiled into a single Win32 application, which can be an executable (
.exe) or a dynamic-link library (.dll). - A sample MS Visual Studio Win32 DLL C++ project (
customdlg_cpp_sample) is provided in the full version of PC Guard to serve as a template. - It is critical to use the appropriate resource control IDs for each dialog element. A complete list of required IDs is available in the
CUSTDLG.Hfile, also included in the full version.
Step 2: Configure PC Guard
- Enable the "Custom dialogs" feature in the project settings.
- Specify the name of the file containing the resources (e.g.,
myapp.dll) in the "Application with custom dialogs" field. Only the filename is required, not the full path. - Provide the string or integer resource ID for each custom dialog to be used. If an ID is left empty, PC Guard will use its default dialog for that function.
- Activation dialog ID
- License removal dialog ID
- License transfer dialog ID
- Password protection dialog ID
- For integer-based identifiers, a '#' prefix must be used (e.g.,
#104).
Important Considerations for Custom Dialogs:
- The application containing the custom dialogs must be located in the same directory as the main protected application.
- If using the remote protection method, resource encryption must not be enabled for the application that holds the dialog resources, as this will prevent the protection code from loading them.
- The "Keep existing dialog titles" option can be selected to preserve the original titles defined in the resource data; otherwise, the "Application name" value is used by default.
- Thorough testing of all custom dialogs is essential before distribution.
1.3. Full Control via Protection Interface
This advanced method grants the developer complete programmatic control over licensing management, bypassing the default UI entirely. The protected application becomes responsible for handling all licensing events.
Implementation Steps:
- Enable demo mode with a date or execution limitation.
- Enable the protection interface.
- Enable the option "Protected application will handle expired demo".
- Enable the option "Protected application will handle license management" to manage license removal, updates, or transfers from within the application code.
- Enable the option "Protected application will handle expired license" to manage scenarios where a limited license expires.
With these settings, the protection code will simply mark the application's status (e.g., expired) and pass control back to the application itself. The application can then use advanced protection interface functions, such as UnlockApplication(), to perform activation and other tasks based on its own custom UI and logic.
Platform and Language Support:
- Direct Integration: Windows 32/64 bit applications can use the protection interface functions directly. Sample source code projects are available for Visual Studio C/C++, Delphi (32/64 bit), C++ Builder (32/64 bit), and Visual Basic 6.
- .NET Integration: .NET applications can utilize an alternate protection interface implementation. C# and VB.NET example projects are provided in the full version.
2. Activation Dialog Configuration
The behavior and features of the main activation dialog can be tailored through several specific settings.
2.1. Invocation Control
- Default Behavior: By default, the activation dialog is displayed on each startup during the evaluation period (if limitation counters are enabled) and after activation to allow for license management (removal, transfer, extension).
- Special Key Pop-up: This feature prevents the dialog from appearing on every run. Instead, the end-user can invoke it by pressing a specific key or combination of keys (Scroll Lock, Caps Lock, CTRL, SHIFT) before launching the application. The developer must instruct users on how to access the dialog if this option is enabled. This feature is ignored if the advanced protection interface options for handling licensing are enabled.
- Command Line Invocation: Using the
-PCG_CL_SHOW(uppercase) command-line parameter when launching the application will force the activation dialog to be displayed, overriding any special key pop-up settings.
2.2. User Experience Options
- Auto-enter Application: When enabled, this option automatically starts the main application after a specified number of seconds if the "Enter application" radio button is selected on the activation dialog. The timer starts when the dialog appears and is canceled if the user selects another option like "Unlock application".
- Merge Site/MID Codes: This option combines the Site Code and MID Code into a single string for display, in the format
SITE-MID (XXXXXXXX-XXXX-XXXX-XXXX-XXXX). This simplifies the interface for the end-user. If custom dialogs are used, they should be checked to ensure they accommodate the longer merged code.
2.3. Security Settings
- Activation Code for License Management: By default, a valid activation code is required to perform a license removal or transfer. This prevents unauthorized users from de-licensing the software. This security check can be disabled by enabling the "Activation code is not required for license removal/transfer" option.
3. Custom Button Implementation
Developers can embed custom buttons into specific dialogs to provide users with direct access to external resources or actions.
- Availability:
- Activation Dialog: Up to 4 custom buttons.
- License Removal Dialog: Up to 2 custom buttons.
- License Transfer Dialog: Up to 2 custom buttons.
3.1. Custom Button Editor
For each button, the following properties can be configured:
- Status: Can be enabled (visible) or disabled (hidden).
- Title: The text displayed on the button.
- Tooltip: A help note that appears on mouse-over.
- Action: The string that is executed when the button is clicked. This can be a URL, a document path, a folder path, or an application name.
3.2. Action String Macros
A powerful set of macros can be used in action strings to pass dynamic, context-specific information.
| Macro | Description |
%SITECODE% | Site code value generated on the user's machine. |
%MIDCODE% | Machine ID (MID) value generated on the user's machine. |
%NEXTSITECODE% | Next site code value (for license extension). |
%NEXTMIDCODE% | Next Machine ID value (for license extension). |
%CSITECODE% | Currently selected Site code. |
%CMIDCODE% | Currently selected MID code. |
%REMOVALCODE% | Removal code (for use on the license removal dialog only). |
%ACENCLIENTID% | Currently set ACEN Client ID. |
%ACENORDERID% | Currently set ACEN Order ID. |
%APPNAME% | Application name. |
%USERNAME% | User name. |
%USERADDRESS% | User address. |
%USERCOMPANY% | User company. |
%USERCUSTOM1-3% | User custom info fields 1, 2, and 3. |
%SERIALNUMBER% | Serial number value. |
%LANGUAGE% | Selected language name. |
%DATETIME% | Current date and time in DD.MM.YYYY HH:MM format. |
%LOGFILE% | Full path to the log file. |
%PARAMS:<params>% | Passes command line parameters to an executable. |
3.3. Example Actions
| Button Title | Action String |
| Send codes | mailto:support@yourdomain.com?Subject="Site/MID code for %APPNAME%"&Body="Site code: %SITECODE% MID code: %MIDCODE%" |
| Homepage | http://www.myhomepage.com |
| Help | help.txt |
| View log | notepad.exe %PARAMS:%LOGFILE%% |
| Activate | activate.exe %PARAMS:%SITECODE% %MIDCODE%% |
Note: Some email clients like Microsoft Outlook may not correctly parse parameters enclosed in quotes.
3.4. Multilingual Support
Button titles and tooltips can be defined separately for each language configured in the language editor, allowing for a fully localized experience. These translations are saved with the project.
4. Language and Localization Management
PC Guard includes a language editor for managing all user interface text and messages.
- Language Editor Settings: These settings are shared globally among all projects on the machine where PC Guard is installed.
- Default Project Language: Each project has a designated default language that serves as the primary UI language. This can be changed at runtime via the
-PCG_CL_LANGAUGEcommand line option. - Optional Languages: By default, all available languages are selected for a project. Developers can deselect languages that are not required for their application. This is recommended as it reduces the final file size of the protected application.