Activation codes are based on project settings and Site/MID codes from remote computer. There are two types of activation codes:
Standard activation code can hold activation key and custom features. It is 35 characters long and has the following structure:
XXXXXXXX-XXXXXXXX-XXXXXXXX-XXXXXXXX
where X can be any hexadecimal number (0-9 and A-F).
Extended activation codes are longer than standard activation codes. These codes can hold the same information as standard activation codes (activation key and custom features) plus demo mode limitations (number of days, number of runs, fixed date limitations), limited license limitations (number of days, number of runs, fixed date limitations), custom counters and maximum allowed number of application instances.
| Standard | Extended | Activation file | |
| Activation key | |||
| Custom features | |||
| Demo mode limitations | |||
| Limited license limitations | |||
| Custom counters | |||
| Max allowed app instances | |||
| User information | |||
| Updates policy | |||
| Serial number |
Generation of activation codes
Activation codes can be generated from PC Guard (activation panel), AC Generator and Activation center (ACEN) manually by end users (clients) and administrator users or automatically by using ACEN web service methods.
Here is general procedure for generating activation codes in activation panel:
1 Load project that was used for protection.
2 Open activation panel.
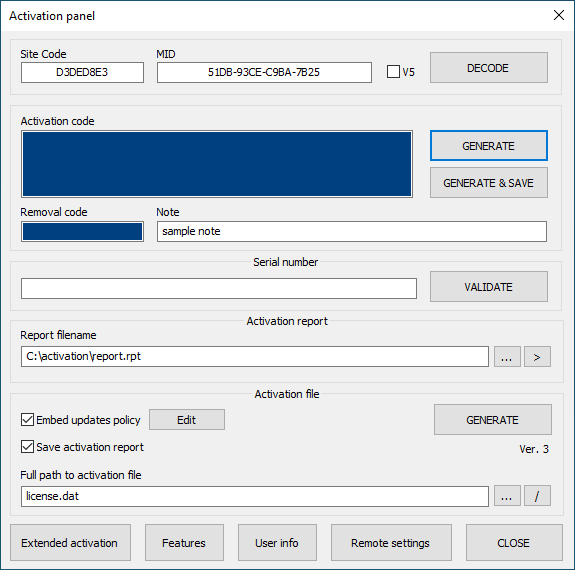
3 Set Site/MID codes from remote computer.
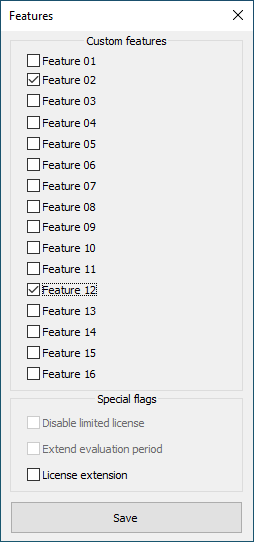
4 Set custom features as required (optional).
5 Set extended activation options as required (optional).
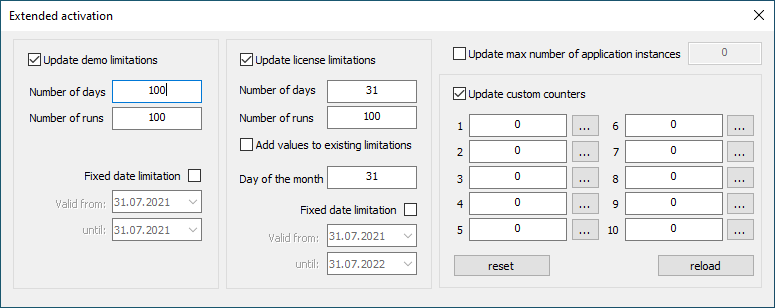
Use extended activation options in case you need to change default demo limitations, change default limited license limitations, change default custom counters or change default maximum number of application instances.
Changing default demo mode limitations
Select Update demo limitations option and set available limitations. Select Fixed date limitation to update fixed date limitations.
Changing default limited license limitations
Select Update license limitations option and set available limitations.
Select Add values to existing limitations if you want to add defined number of days and number of runs values to existing counters on remote computer. By default, these values will replace existing counters in remote computer.
If required, change default day of the month expiration. Select Fixed date limitation to update fixed date limitations.
Changing default custom counters
Select Update custom counters option and set custom counters as required. These counters will replace existing counters on remote computer.
Click on reload button to reload default values of custom counters from project settings. Click on reset button to reset all counters to zero.
Changing default maximum number of application instances
Select Update max number of application instances option and set appropriate value.
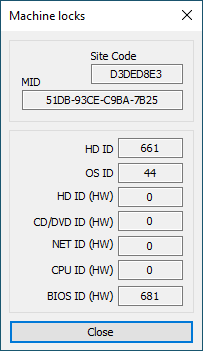
6 Click on DECODE button to decode Machine ID (MID) and display locking parameters window. (optional)
7 Click on GENERATE button to generate activation code.
PC Guard will also automatically generate removal code for license removal feature. Validation of Site/MID codes is also automatically done before activation code is generated.
8 Click on SAVE button to save information about generated activation code to activation report.
Activation report is a text file with all relevant information about generated activation code and activation files.